Wednesday, March 16, 2011

Gwennie's goals

In a recent post on Texas Moments, I wrote about the book that Gwendolyn and I made for her use in making goals. Since blogger apparently doesn't allow pdfs, I made a handful of images to show part of the layout of the pamphlet, including the cover and the title page (above). Gwennie says, "these goals will help because I get a prize when I finish a section. I'm starting with goals about not responding in anger, memorizing five poems and making one of my own, finding an animal shelter to donate a special amount of money to, and reading books by my favorite author and writing a story from the perspective of my favorite character." The images below, after the contents, represent one of the four sections in the booklet.


Thursday, February 3, 2011

Chinese Dinner!

(It was actually an accident that I posted this on Chinese New Year --it must have been something in the air...)

This dinner is a favorite that we made a nearly-monthly tradition with the Ricks family when we lived in Rexburg --mostly because it is delicious and too good to just make for yourself, but also because it makes so much, and it's nice to split up the work as well.


Egg Rolls

2 Bags coleslaw mix
3 Chicken breasts cooked (boiled and shredded is how I do it) or the equivalent meat of a rotisserie chicken shredded (much tastier, but don't get one with any special flavoring like rosemary or barbecue.)
2 T Soy sauce
2 T Wok oil (can be bought near the soy sauce -this is a key ingredient, it's infused with garlic and other spices)

Heat slowly in large pan with lid until cabbage is tender.
Let cool in fridge for an hour or so --if you don't, the steam will turn the wrappers into mush (yeah... learned from experience.)

Wrap in large egg roll wrappers (can be found in the produce section near the tofu and wontons and foreign foods) follow directions on back of package. This recipe can fill two packages of wraps (about 23 egg rolls each).

Fry in 1-2 in. of oil until just barely golden. Keep temperature around 300-350 deg. F. (We use our electric skillet to keep the temperature of the oil from getting too hot. I'm sure you could do it on the stove, or in a deep fryer too.)

These are my favorite egg rolls, I actually didn't ever like egg rolls before this recipe came along, and I think they're even better than those at the restaurants. They're also really easy--no shredding cabbage for me (wrapping takes the longest actually). Leftovers can be heated in the microwave until warmed through, and then put under the broiler or in a toaster oven for a few minutes to get the outsides crispy again. Yum!


Sweet and Sour Sauce

In saucepan combine:
1 tsp Ketchup
2/3 c Brown sugar (mix with ketchup so ketchup doesn't clump and float)
1/4 c White vinegar
2/3 c Pineapple juice or Mandarin orange juice --or both if you're doubling (drained from the can you get exactly 2/3 cup)
1 tsp Soy Sauce

Boil together, then to thicken add
1/4 cup cold water and 2 Tb Corn Starch mixed
Boil until desired thickness -may add pineapple tidbits at this point if you like.


I've been through quite a few sweet and sour recipes but this is my favorite. It's not like the red stuff you get at buffets, more like what you'd get at Fong's in Rexburg. I also always double this if I'm making the whole meal.


Batter-Fried Chicken (for sweet and sour chicken)

1 c flour
1 c milk
1 tsp baking powder
1/2 tsp salt
1 egg

Heat oil to 350-375 deg. F
Dip dry chicken breast pieces (cut into 1in. cubes or finger size strips) in batter and fry til golden.

Make sure the pieces of chicken aren't too thick, or you'll have to really brown them to cook them through, but don't make them too thin, or the chicken will be dry and leathery. The batter will easily cover 3 large chicken breasts, (judge about 1/3 of a chicken breast per adult). Let the chicken cool on a cooling rack over some paper towels to catch the excess oil (same for the egg rolls).


Doesn't that look so yummy!?

Now, Andrea just needs to post her excellent recipe for Fried Rice (hint hint) pictured above, and to counteract the carbs, add a favorite steamed vegetable, and voila! the perfect Chinese dinner!

It's a lot of work, but it's so worth it! Just give yourself at least 2-3 hours to get everything ready and cooked, and prepare as much as possible beforehand --cooking and shredding the chicken for the egg rolls can be done the day before, in fact the filling for the egg rolls can be refrigerated overnight --just don't wrap them until you're ready to fry them, and it probably wouldn't hurt the fried rice to be rewarmed the next day either.
Also, if you're like me, and you don't want your house to smell like fried food for days, invest in an electric skillet and plug it in outside to do the cooking. Please be careful with the hot oil! I'd hate to hear that anyone got hurt because of this recipe. If you use your skillet for the egg roll filling and wash it, make sure it is completely dry (like even turn it on warm for a bit to evaporate any water off), cause any molecule of water that is in the pan will make the oil sputter and pop. Keep a spatter guard handy and wear an apron.


Monday, November 29, 2010

butterbeer

When the Harry Potter theme park opened in Florida, several of the news reports (which we were obligated to read to Gwennie and Linus) made a big deal of the butterbeer which was being sold in the Hogsmeade section of the park. Though that drink sounds like little more than an upscale cream soda, it renewed interest in the beverage around our house.

After looking at some recipe attempts on the internets and rejecting them as pretty gross-sounding (many were based on carbonated drinks, and one actually included melting vanilla ice cream and adding it to the soda), I found a recipe in a book which I was able to adapt. Not only is it delicious, but it has the advantage of including butter as its base. So I should note that, while it does not consist of melted ice cream, it is not exactly a health shake. But for an occasional indulgence, it's been well received around here.

Butterbeer

2 cups water
1/2 stick butter
1 packed cup brown sugar
1/4 cup sugar
pinch of salt
1 tsp cinnamon
1/2 tsp nutmeg
shake of ground cloves
1 cup heavy cream
1 cup milk

Melt the sugars and the butter in the water over high heat, whisking to dissolve the sugars in the liquid. After they are fully integrated, reduce the heat to low and add the salt and spices, heating until quite hot. Meanwhile, mix the cream and milk in a blender and process until frothy. (The dairy seems to thicken best if blended cold.)

Ladle 1/4 cup of the cream mixture into a mug, followed by 3/4 cup of the spice liquid. Stirring with the tip of your wand may be considered bad manners, but no one objects to seeing frothy mustaches from a hearty gulp of butterbeer.

Thursday, September 23, 2010

Melon Pops!

Have you ever picked out a melon, be it cantaloupe or honeydew, and found the flavor to be less than sweet, or the texture too mushy to enjoy? What then? Do you throw it out, or let it sit in your fridge until mold allows you to justify trashing it so you don't feel quite so wasteful?

I went for years not even trying to pick out melons because I couldn't stand the disappointment of a bad one. Luckily though, I have found the perfect solution... Melon Pops! And since it's that time of year right now, I thought I would share.


It started with a honeydew --one of those that just isn't sweet. I didn't want to throw it out, but even the kids didn't really like it. I just happened to have some leftover sweetened condensed milk in the fridge, so I tried dipping it, which helped some, but then Richard made remark about popsicles and an idea was born. I blended up the left over melon, added sweetened condensed milk until it was satisfactorily sweet, and froze it in some forms we had gotten from the dollar store. Voila! Melon Pops! They were fantastic! I was surprised at the creaminess of the texture actually, and I felt that with that much actual fruit, it was bound to be good for you. In fact, these popsicles are actually pretty filling. We've tried it with fat free sweetened condensed milk and it might be less smooth (some brands can be gritty) but it usually works just as well. We've only tried honeydew a and cantaloupe, but are looking forward to experimenting with others. Here's a basic recipe:

Melon Pops-

1 Melon (of the muskmelon variety--meaning not watermelon) off the rind and cut into chunks or "smiles" as we call them
2-3 T Sweetened condensed milk (amount will vary depending on the sweetness of the fruit, just taste it and adjust to your liking)

Put all ingredients in blender, blend on high, and pulse if necessary till it is smooth. Freeze in popsicle forms, ice cube trays with toothpicks, or paper cups with wooden popsicle sticks for a few hours or until solid.

Enjoy!


Note: Picking out melons can be tricky, but here are a few things I've found to be helpful:
-Smell is a huge indicator of sweetness.
-Color is also helpful; Cantaloupes should be more yellowish than green, honeydews should also have a milky white or yellow color.
-Finally, your should feel the ends, if you push on it you can usually tell if the fruit is going to be too ripe and mushy --pick a firmer fruit but not too firm. Of course, now that you know what to do if you pick amiss, it doesn't really matter does it?

One other note: Melons that are really too green don't work as well, since sometimes people like me can have allergic reactions such as itchy ears --the kids wouldn't eat popsicles made out of those ones either even though they were perfectly sweet.


Thursday, April 15, 2010

Homemade Pizza

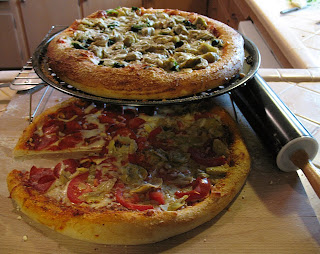
I expect that everyone has a version of homemade pizza which they make regularly, but we've fallen into this particular variant recently (called "Puffaroni" by Gwendolyn because the crust gets so fluffy), and we've all been loving it.

Basic Dough:

olive oil
4 cups bread flour
1 1/3 tsp quick-rise yeast
2/3 tsp salt
1 1/3 cup water, 110 degrees F

Mix the dry ingredients, then add the lukewarm water to the mixture (a mixer with a dough hook or paddle attachment is useful). Once you have a shaggy mass, turn the dough onto a floured surface and knead it lightly; it will remain somewhat sticky. Place in a bowl which you have greased with the olive oil, turning the dough to grease its sides, and let it warm until doubled, around 45 minutes.

Whole Wheat Dough:

1 2/3 cup water
1/3 cup olive oil
3 1/8 cups all-purpose flour
1 1/4 cup whole wheat flour
scant 2 tsp salt
1 Tbsp bread machine yeast

We allow this recipe to mix in our bread machine on the dough setting, which provides it with a great environment for the yeast to rise, but I suppose that it could also be made by hand.

In either case, the risen dough should be divided in two equal portions, which can be shaped into rounds, tossed or rolled flat (allowing several minutes between sessions for the dough to relax), and shaped or placed on a round pizza pan. Allowing the dough time to rise after it's been shaped makes a big difference in the final results, we've found. Meanwhile, preheat the oven to 450 or 500 degrees. If you have a pizza stone, as we do, place it on the lower rack and allow it to heat as well.

A friend in Boston taught me a handy way of cooking pizzas. Matt would par-bake the crusts with the sauce for half the cooking time, then would add the toppings and return it to the oven. So when the oven is ready, we spread bottled marinara sauce (we prefer Barilla tomato and basil) over the dough and place it in the oven for six to seven minutes while we prepare the other crust.

After taking the partially-baked crust from the oven, I brush some creamy salad dressing (something like Girard's Caesar) around the outer edge and sprinkle parmesan cheese on it to give the crust a little flavor, but this can be skipped in the interest of diet or health. We generally improvise the rest, but we tend to include grated mozzarella, some herbs or spices (fresh black pepper, dried thyme, shallot pepper, or whatever's on hand), and whatever the family likes. The pizza is then returned to the oven for another six or seven minutes, and after cooling for a few minutes, it's ready to be devoured.

Where toppings are concerned, we tend to keep some pepperoni in the freezer for the children, but Jen and I prefer vegetable pizzas. Our last foray included a fresh tomato/artichoke heart pizza and a spinach/artichoke pizza which I found particularly irresistible. In case you're interested in trying it, here's the recipe for the artichoke hearts:

1 Tbsp olive oil
9 oz frozen artichoke hearts, thawed and roughly chopped
2 shallots, minced
juice of 1/4 lemon
1/2 cup water
1/2 tsp salt

Heat the oil over medium, and add the minced shallots when heated, cooking until soft and translucent. (Can I also mention the love affair I've been having with shallots since I started cooking with them last year? -- they're incredible. Nero Wolfe would be proud.) Add the artichokes, lemon juice, water, and salt, then cover. Cook for an additional 5 or 6 minutes until the artichokes are tender, then uncover and continue cooking until the liquid has evaporated. Let cool. (If you're also adding spinach, just cook it in boiling water for 2 minutes, then shock it in cool water and press it hard to drain the water. Roughly chop it before adding it to the pizza, and enjoy.)

Thursday, April 8, 2010

Lemon Pepper Chicken Pita Sandwiches

This is something we learned from our friends in Jackson. I think they're healthy, although we could have made them healthier if I knew where to find whole wheat pitas and didn't use so much cheese or dressing. (Dressing not pictured, I forgot it when I was taking pictures).

Here's the recipe.

Lemon Pepper Chicken Pita Sandwiches:

1 Rotisserie Chicken (or just cook your own whole fryer)--shred and put in sauce pan
1/2 T Lemon Pepper
2 T Lemon Juice
1/3 c water
2 Chicken Bouillon cubes

Bring to a boil on the stove, then add the bouillon cubes and simmer to reduce water (honestly, it's not much water, so just do what you can to get the bouillon cubes incorporated before you run out of water. Also, I didn't have any lemons, but lime worked just great!) remove from heat.

Cut about an inch and a half thick strip off the top of your pitas, open them and stick some slices of Pepper Jack cheese inside (or other favorite white cheese). Put on cookie sheet and warm in oven just enough to melt cheese (we actually didn't have any cheese, so I just spread the insides with cream cheese and it was also delicious).

Fill the pita pockets with the chicken, lettuce, tomatoes, olives, peppers, and whatever else you feel like. Top with Ranch Dressing and enjoy!

Friday, April 2, 2010

Greek Chicken Wraps (Andrea)


Sorry about this picture: again, I remembered when the last one was being eaten. Thanks, Kevin.)

This is one of our favorite meals (in fact, we've had it twice in the last month) and works really well with grilled chicken. We love the way this meal tastes, and it is really quite easy to prepare and also quite healthy.

GREEK CHICKEN WRAPS

2-3 large chicken breasts, grilled (or however you want to cook them) and cut up into bite-size pieces. Our standard grilling topping is to sprinkle equal amounts of onion powder, garlic powder, marjoram, kosher salt, fresh ground pepper, and Mrs. Dash (the one with the yellow lid, although any onion/garlic based season salt will probably work).

Feta cheese

Tomatoes, diced

Jack cheese

Lettuce leaves (Bibb lettuce is awesome, but we've used Romaine before and it works well, too because it's larger)

Tzatziki sauce: (mix all these together)
1 cucumber, sliced and quartered
1 c. light sour cream
1 c. plain yogurt
Kosher salt and fresh ground pepper to taste

Get a lettuce leaf, and assemble your wrap with any or all of the ingredients (we have tried it with fresh mango, too, which is good). Kind of messy, but yummy. If your kids don't want to have it in lettuce, then these work just as well in regular tortillas.

Hope you enjoy--let me know if you make them and how they turn out.